
My 4 and 7 year old daughters enjoy my silly treats and sharing them with their classmates, I just hope they humor me when they’re older because I get a real kick out of making them. I made these cupcakes last year for the first time, but this year, the girls were old enough to help. While their attention spans didn’t exactly go the distance, they did enjoy putting on their aprons and performing the ever-important duties of frosting testers.
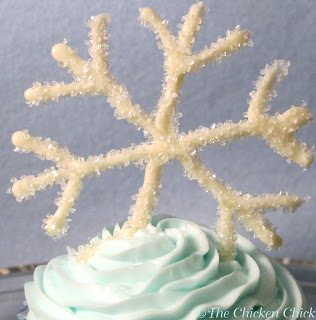
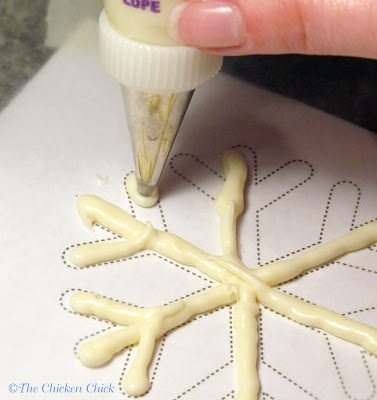
These white chocolate snowflakes are much easier to make than they may appear. One word of caution, however: err on the side of piping the white candy melts lines thicker rather than thinner or else they will break, which is fine…if you want chicken feet cupcakes.

DIY SNOWFLAKE CUPCAKES
SUPPLIES NEEDED
cupcakes
butter cream icing, tinted (purchased from my grocery store’s bake shop. Take the help if you can get it!)
decorator sugar or sugar pearls
2 disposable cake decorating bags
Wilton decorating tips #5 (writing) and #21 (star)
1/2 cup white Wilton Candy Melts
wax paper or parchment paper
tape
Link to Snowflake template ( print several copies)
LET’S MAKE IT!
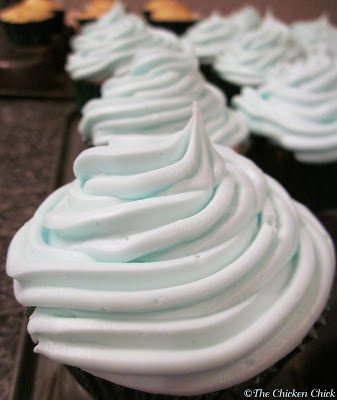
Fit decorating bag with star tip #21 and frost starting at outside edge, moving in circles towards the center to finish.
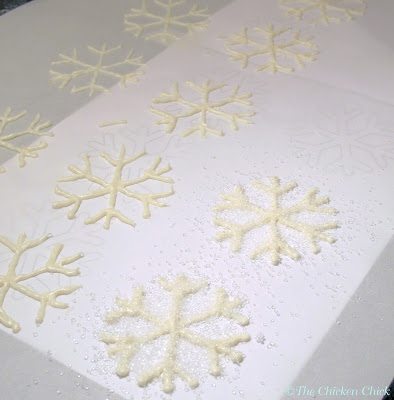
Tape snowflake templates onto work surface, side-by-side.
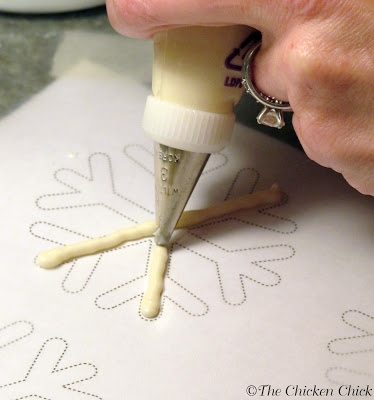
Place wax paper over top of templates and tape in place.
Place candy melts in a small bowl and microwave 30 seconds at a time. Remove, stir and repeat in 30 second increments until just melted. (It shouldn’t take more than 2 minutes total. Careful not to over-heat)
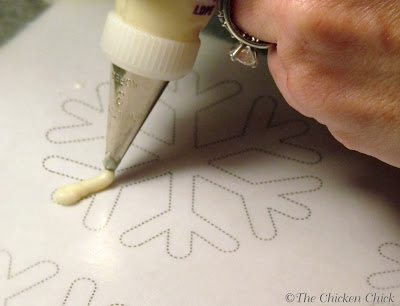
Fit decorating bag with writing tip #5 & pour candy melts into bag. Pipe snowflake from outside edge, in towards center, applying enough pressure to meet both sides of the template’s dotted lines (or else the snowflakes will be too thin and break). Work quickly as chocolate hardens quickly.
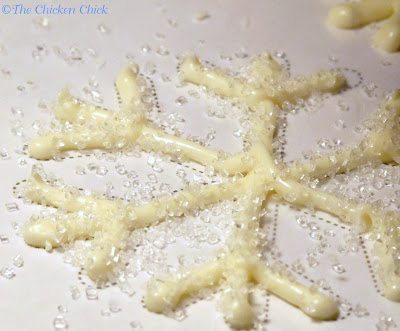
When finished with ONE snowflake, immediately sprinkle with decorator sugar or sugar pearls. The chocolate dries extremely quickly!
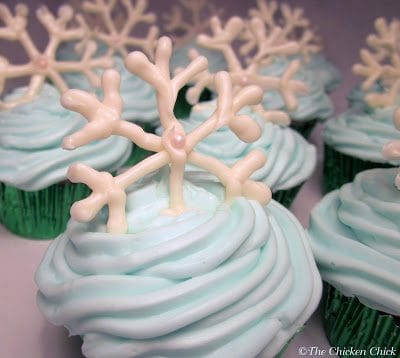
Gently insert snowflakes into cupcakes.

This post is shared with: Adorned from Above, Artsy Corner, Bloom Designs, Ducks ‘n a Row, Fluster Buster, Glitter Glue & Paint,Made in a Day,Mums Make Lists, Savvy Southern Style , The DIY Dreamer, The Pin Junkie

Kathy Shea Mormino
Affectionately known internationally as The Chicken Chick®, Kathy Shea Mormino shares a fun-loving, informative style to raising backyard chickens. …Read on


My 4 and 7 year old daughters enjoy my silly treats and sharing them with their classmates, I just hope they humor me when they’re older because I get a real kick out of making them. I made these cupcakes last year for the first time, but this year, the girls were old enough to help. While their attention spans didn’t exactly go the distance, they did enjoy putting on their aprons and performing the ever-important duties of frosting testers.
These white chocolate snowflakes are much easier to make than they may appear. One word of caution, however: err on the side of piping the white candy melts lines thicker rather than thinner or else they will break, which is fine…if you want chicken feet cupcakes.
DIY SNOWFLAKE CUPCAKES
SUPPLIES NEEDED
cupcakes
butter cream icing, tinted (purchased from my grocery store’s bake shop. Take the help if you can get it!)
decorator sugar or sugar pearls
2 disposable cake decorating bags
Wilton decorating tips #5 (writing) and #21 (star)
1/2 cup white Wilton Candy Melts
wax paper or parchment paper
tape
Link to Snowflake template ( print several copies)
LET’S MAKE IT!
Fit decorating bag with star tip #21 and frost starting at outside edge, moving in circles towards the center to finish.
Tape snowflake templates onto work surface, side-by-side.
Place wax paper over top of templates and tape in place.
Place candy melts in a small bowl and microwave 30 seconds at a time. Remove, stir and repeat in 30 second increments until just melted. (It shouldn’t take more than 2 minutes total. Careful not to over-heat)
Fit decorating bag with writing tip #5 & pour candy melts into bag. Pipe snowflake from outside edge, in towards center, applying enough pressure to meet both sides of the template’s dotted lines (or else the snowflakes will be too thin and break). Work quickly as chocolate hardens quickly.
When finished with ONE snowflake, immediately sprinkle with decorator sugar or sugar pearls. The chocolate dries extremely quickly!
Gently insert snowflakes into cupcakes.
This post is shared with: Adorned from Above, Artsy Corner, Bloom Designs, Ducks ‘n a Row, Fluster Buster, Glitter Glue & Paint,Made in a Day,Mums Make Lists, Savvy Southern Style , The DIY Dreamer, The Pin Junkie


I probably wouldn't put the snowflakes in the cupcakes until the day of the event.
So pretty! Any idea how long these would last (the chocolate snowflakes)? I want to make some for my daughter's birthday party & am wondering how far in ad
vance I could make them… thanks! :)