
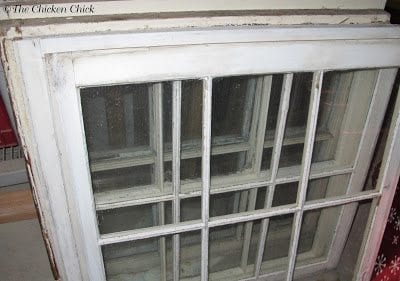
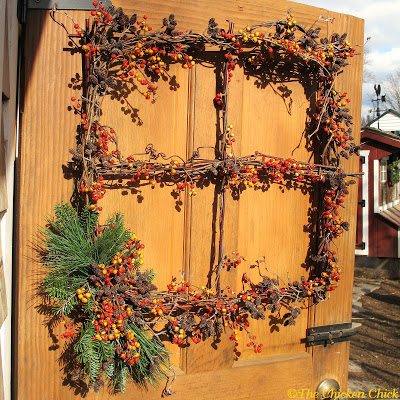
A set of found windows has been living in my basement, waiting to be given new life and this week, I turned one of them into a winter decoration with minimal effort and no expense. Using materials from Christmases past, I transformed a beautiful, old window frame into sparkly holiday wall decor.
DIY RUSTIC WINTER WINDOW
SUPPLIES NEEDED
an old window frame
wired burlap ribbon
staple gun & staples
snowflake ornaments
wired garland
picture hanging wire
2 screws
screwdriver
sandpaper
a burlap stocking
LET’S MAKE IT!
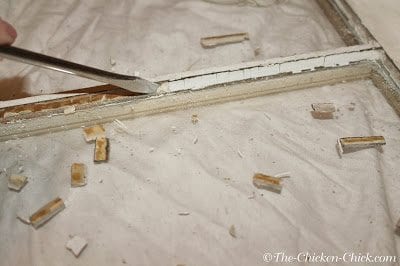
I saw it as a personal challenge to remove the glass from the window without breaking any since most of what I read about the process suggested breakage was likely. With nothing more than a flat head screwdriver, the ancient seals were chipped away and victory was mine.

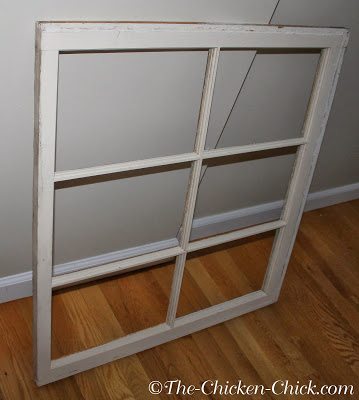
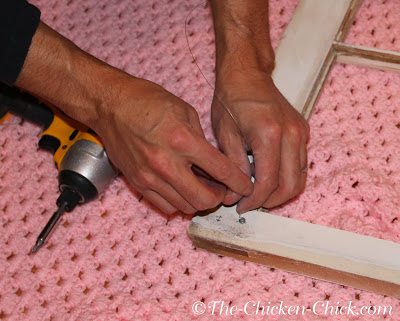
Once it was glass-free, I lightly sanded it to distress the edges a little. Two screws were then attached to the back of the frame, around which the picture-hanging wire was wound. (pink afghan, optional)
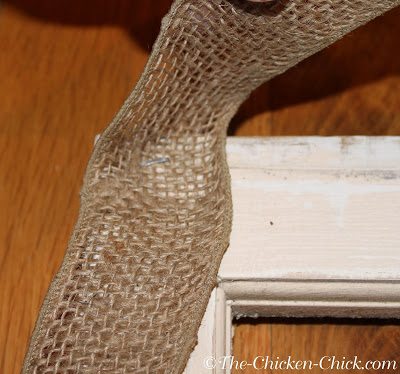
The ribbon, garland, snowflakes and stocking were stapled to the frame.
I placed some rope lights behind the frame as it hung on the wall, which gives it a pretty effect at night.

By far the most difficult part of this project was photographing it indoors, but Mother Nature provided a little help and inspiration with a pre-Christmas snowfall and a few glimpses of sun this week.


This post was shared here: A Princess & Her Cowboys,Bloom Designs Online, Feeding Big, Hibiscus House, Lamberts LatelyLavender Garden Cottage,Lovely Ladies LinkyMade in a Day,Pincentive Blog Hop, Pink Recipe Box, The Diy Dreamer, The Mommy Club, The Northeast Bloggers Network, The Pin Junkie, This Mama’s Meanderings, Tip Junkie, Crafts a la Mode, Whimsey Wednesday

Kathy Shea Mormino
Affectionately known internationally as The Chicken Chick®, Kathy Shea Mormino shares a fun-loving, informative style to raising backyard chickens. …Read on


shop my SPONSORS


A set of found windows has been living in my basement, waiting to be given new life and this week, I turned one of them into a winter decoration with minimal effort and no expense. Using materials from Christmases past, I transformed a beautiful, old window frame into sparkly holiday wall decor.
DIY RUSTIC WINTER WINDOW
SUPPLIES NEEDED
an old window frame
wired burlap ribbon
staple gun & staples
snowflake ornaments
wired garland
picture hanging wire
2 screws
screwdriver
sandpaper
a burlap stocking
LET’S MAKE IT!
I saw it as a personal challenge to remove the glass from the window without breaking any since most of what I read about the process suggested breakage was likely. With nothing more than a flat head screwdriver, the ancient seals were chipped away and victory was mine.
Once it was glass-free, I lightly sanded it to distress the edges a little. Two screws were then attached to the back of the frame, around which the picture-hanging wire was wound. (pink afghan, optional)
The ribbon, garland, snowflakes and stocking were stapled to the frame.
I placed some rope lights behind the frame as it hung on the wall, which gives it a pretty effect at night.
By far the most difficult part of this project was photographing it indoors, but Mother Nature provided a little help and inspiration with a pre-Christmas snowfall and a few glimpses of sun this week.
This post was shared here: A Princess & Her Cowboys,Bloom Designs Online, Feeding Big, Hibiscus House, Lamberts LatelyLavender Garden Cottage,Lovely Ladies LinkyMade in a Day,Pincentive Blog Hop, Pink Recipe Box, The Diy Dreamer, The Mommy Club, The Northeast Bloggers Network, The Pin Junkie, This Mama’s Meanderings, Tip Junkie, Crafts a la Mode, Whimsey Wednesday


Great idea. Looks so charming. I made 4 of you chicken wire ball lights! My 2 year old neighbor loves them!
Thank you, Tina! I would love to have you link up at my Clever Chicks Blog Hop if you'd like! Here's this week's party: https://the-chicken-chick.com/2014/11/clever-chicks-blog-hop-115-with-henbag.html
Thanks for visiting!