
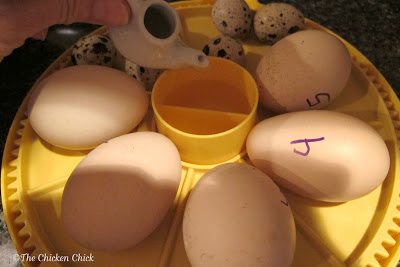
So far, we’ve discussed hatching addiction, roosters, broody hens, shipped eggs, caring for hatching eggs, hatchability of eggs and incubator basics. Now we turn to embryo development and candling. It has been seven days since I set the Buff Orpington eggs in the incubator. The temperature has remained a rock-solid 99.8°F, the eggs have been turned every 45 minutes by the automatic turner and I have added water a couple of times as the level in the reservoir dropped. Now the fun begins- it’s time to candle the eggs
ABOUT CANDLING
Candling is the term used for shining a light through an eggshell to see what’s happening inside. The reason to candle to see whether the embryo is developing or not; those that are not developing should be removed from the incubator on day 14 (or sooner if they begin to smell bad). There are many reasons an egg could fail to develop or begin developing and stop.
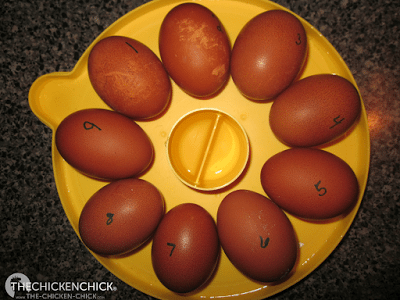
White and light brown eggs are the easiest to candle as there is little to no pigmentation on the eggshell. Pigmentation in blue eggs runs all the way through the shell, making blue eggs a little more difficult to candle than white or light brown eggs. Dark brown eggs (eg: Black Copper Marans, Pendesenca, Welsummer) are among the most challenging eggs to candle as the brown pigment is laid in a fairly thick layer on top of the eggshell. Dark green and olive colored eggs are also very challenging as the blue pigment permeates the shell and the dark brown pigment lies on top of the shell.
HOW TO CANDLE
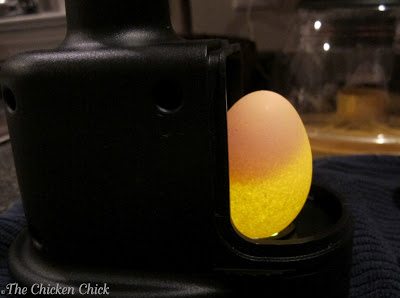
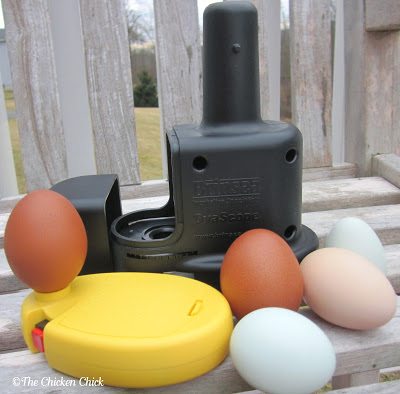
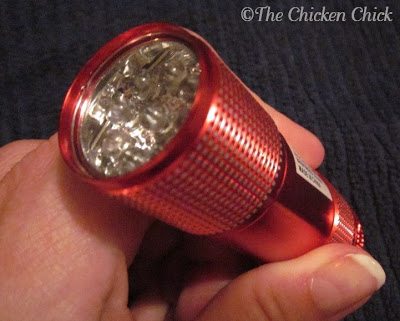
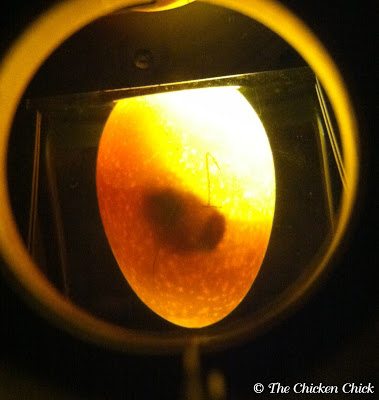
When candling an egg, a light is held up to the wide end of the egg (the air cell end) in order to illuminate the shell’s contents. The darker the eggshell, the brighter the light required to get a good look at what’s going on inside. I have used any number of candling devices from homemade to commercial candlers and can report that, with all except the very darkest eggshells, a good, bright LED flashlight is sufficient. The homemade candlers were worthless and the best commercial candlers are relatively expensive, but effective. This is the Brinsea Ovascope with the candling light off.
.JPG)
Brinsea Ovascope (black) and high-intensity candler (yellow) The Ovascope sits on top of the candler.
I candle with the Brinsea high intensity Ovascope and while it is a good investment for the hatch-a-holic, the infrequent hatcher will get along just fine with a two dollar flashlight. The other advantage to the high-intensity OvaScope, beyond candling dark eggs better than a flashlight, is that it frees up my hands for taking photos. I always place a towel on the work surface where I will be candling in case I drop an egg so its fall is cushioned. I have broken more eggs during candling than I wish to recall. Watch the OvaScope IN ACTION with twin embryos on my YouTube channel HERE!
.JPG)
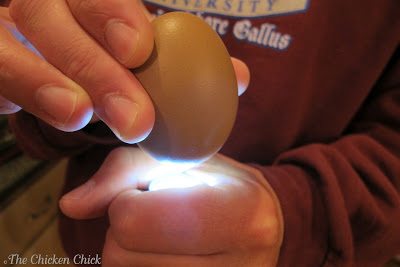
When I candle with a flashlight, I do so at night in a dark room or during the day, in a closet. (yes, I have candled in my pantry) I grasp the flashlight in one hand and place the wide end of the egg on top of my index finger and thumb so that no light leaks out from around the egg. Works like a charm.
WHAT TO LOOK FOR WHEN CANDLING
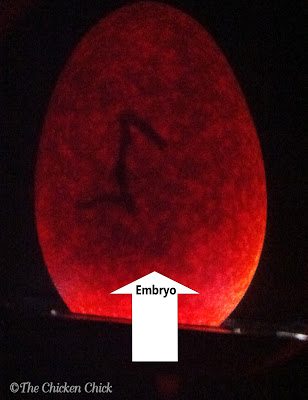
1. Embryo development: My article on embryo development illustrates with great detail the stages of growth day-by-day as seen from the inside and outside of the egg. All eggs will have an oval shadow inside, which is the yolk. After a minimum of 4 days of incubation, a dark spot inside the yolk should be visible with veins extending out from it in a spider-like formation.

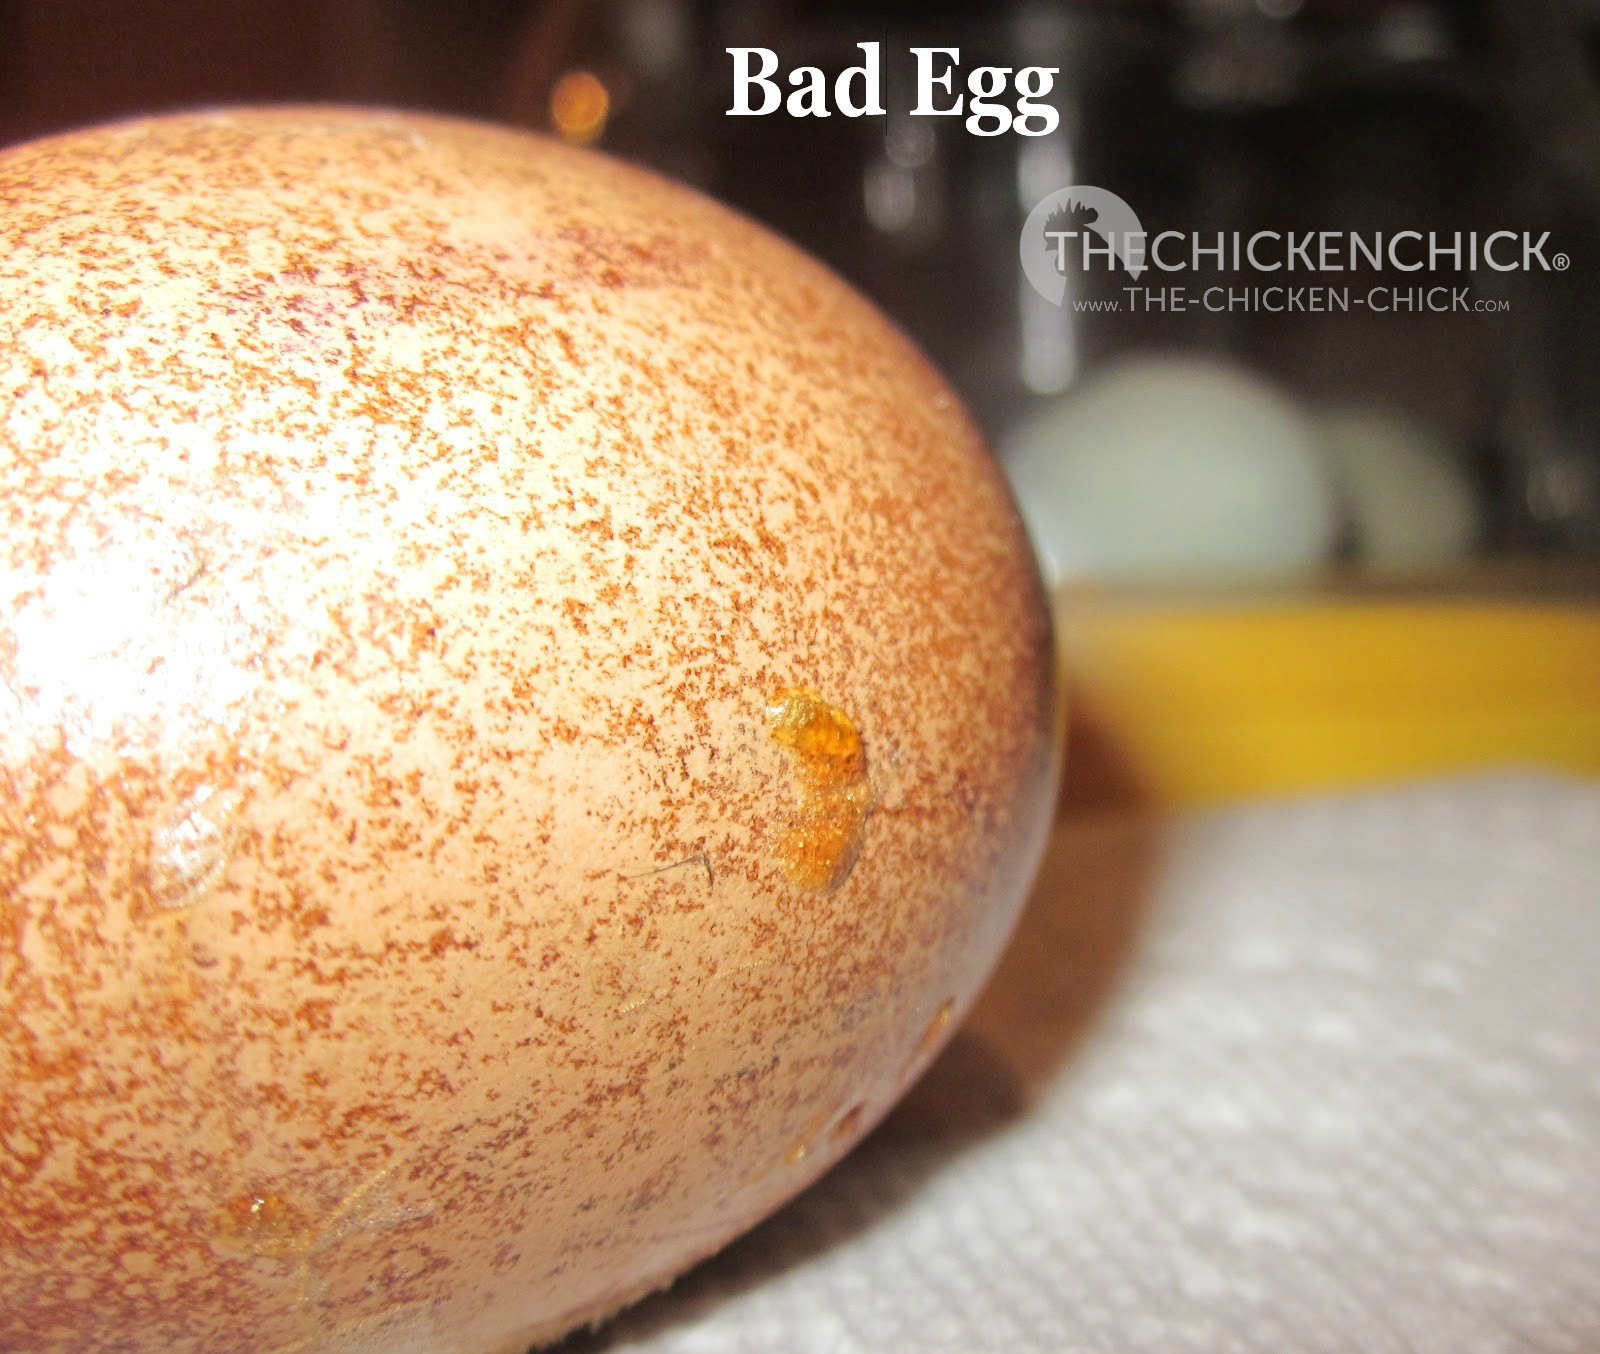
Bad Eggs A red ring around the egg indicates embryo death and the egg should be removed from the incubator immediately.

Always wash hands before candling to avoid contamination. I always SMELL the eggs when candling for signs that the egg has died from bacterial contamination. If a bad egg explodes, it can contaminate and compromise the entire hatch. A bad egg has a distinctive, putrid stench- there’s no question when there is a bad egg in the bator. On the days that I don’t candle, I make a point of getting near enough to the incubator to be able to smell any bad eggs at the earliest stage possible. More on bad egg detection and handling here. The following photo is a late quitter. It began developing and then died.
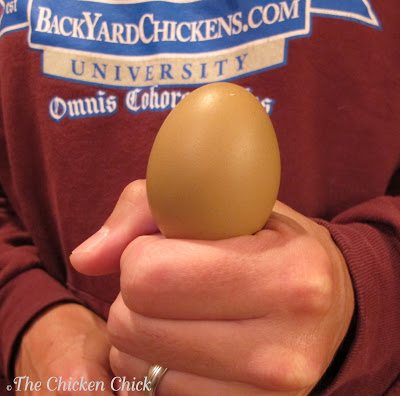
2. Air cell enlargement: Another indication of development is the size of the air cell. All eggs have an air pocket between the two membranes inside the shell. Ideally, it is located at the wide/large end of the egg. When an egg is first collected, the air cell will be small but during incubation, it quickly becomes larger. As the embryo grows, moisture is lost through the cell’s pores, which causes the air cell to increase in size. When I was new to incubating, I would take a pencil and mark the air cells’ positions before I set them in the bator and when I would candle, I would mark the position again. It’s interesting to see how quickly the air cell grows in three weeks.
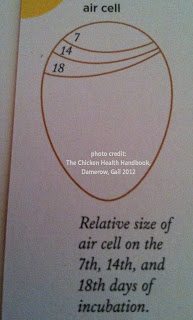
I candle much more often than is necessary or recommended. You can see from this picture that there are many pencil lines marking the days on which I candled- that is generally not a good idea. Most incubators are very sensitive to fluctuations in temperature and humidity and too-frequent opening of the incubator can compromise the hatch. A good rule of thumb is to candle at days 7, 14 and 18.
These are photos that I took today of my Buff Orpington egglets. The visibility is not what I would ordinarily expect from light brown eggs, but I can tell that all five are developing!
.JPG)
.JPG)
.JPG)
Hatch-along:Part 1, Part 2, Part 3, Part 4, Part 5, Part 6, Part 7, Part 8

Kathy Shea Mormino
Affectionately known internationally as The Chicken Chick®, Kathy Shea Mormino shares a fun-loving, informative style to raising backyard chickens. …Read on


So far, we’ve discussed hatching addiction, roosters, broody hens, shipped eggs, caring for hatching eggs, hatchability of eggs and incubator basics. Now we turn to embryo development and candling. It has been seven days since I set the Buff Orpington eggs in the incubator. The temperature has remained a rock-solid 99.8°F, the eggs have been turned every 45 minutes by the automatic turner and I have added water a couple of times as the level in the reservoir dropped. Now the fun begins- it’s time to candle the eggs
ABOUT CANDLING
Candling is the term used for shining a light through an eggshell to see what’s happening inside. The reason to candle to see whether the embryo is developing or not; those that are not developing should be removed from the incubator on day 14 (or sooner if they begin to smell bad). There are many reasons an egg could fail to develop or begin developing and stop.
White and light brown eggs are the easiest to candle as there is little to no pigmentation on the eggshell. Pigmentation in blue eggs runs all the way through the shell, making blue eggs a little more difficult to candle than white or light brown eggs. Dark brown eggs (eg: Black Copper Marans, Pendesenca, Welsummer) are among the most challenging eggs to candle as the brown pigment is laid in a fairly thick layer on top of the eggshell. Dark green and olive colored eggs are also very challenging as the blue pigment permeates the shell and the dark brown pigment lies on top of the shell.
HOW TO CANDLE
When candling an egg, a light is held up to the wide end of the egg (the air cell end) in order to illuminate the shell’s contents. The darker the eggshell, the brighter the light required to get a good look at what’s going on inside. I have used any number of candling devices from homemade to commercial candlers and can report that, with all except the very darkest eggshells, a good, bright LED flashlight is sufficient. The homemade candlers were worthless and the best commercial candlers are relatively expensive, but effective. This is the Brinsea Ovascope with the candling light off.
Brinsea Ovascope (black) and high-intensity candler (yellow) The Ovascope sits on top of the candler.
I candle with the Brinsea high intensity Ovascope and while it is a good investment for the hatch-a-holic, the infrequent hatcher will get along just fine with a two dollar flashlight. The other advantage to the high-intensity OvaScope, beyond candling dark eggs better than a flashlight, is that it frees up my hands for taking photos. I always place a towel on the work surface where I will be candling in case I drop an egg so its fall is cushioned. I have broken more eggs during candling than I wish to recall. Watch the OvaScope IN ACTION with twin embryos on my YouTube channel HERE!
When I candle with a flashlight, I do so at night in a dark room or during the day, in a closet. (yes, I have candled in my pantry) I grasp the flashlight in one hand and place the wide end of the egg on top of my index finger and thumb so that no light leaks out from around the egg. Works like a charm.
WHAT TO LOOK FOR WHEN CANDLING
1. Embryo development: My article on embryo development illustrates with great detail the stages of growth day-by-day as seen from the inside and outside of the egg. All eggs will have an oval shadow inside, which is the yolk. After a minimum of 4 days of incubation, a dark spot inside the yolk should be visible with veins extending out from it in a spider-like formation.
Bad Eggs A red ring around the egg indicates embryo death and the egg should be removed from the incubator immediately.
Always wash hands before candling to avoid contamination. I always SMELL the eggs when candling for signs that the egg has died from bacterial contamination. If a bad egg explodes, it can contaminate and compromise the entire hatch. A bad egg has a distinctive, putrid stench- there’s no question when there is a bad egg in the bator. On the days that I don’t candle, I make a point of getting near enough to the incubator to be able to smell any bad eggs at the earliest stage possible. More on bad egg detection and handling here. The following photo is a late quitter. It began developing and then died.
2. Air cell enlargement: Another indication of development is the size of the air cell. All eggs have an air pocket between the two membranes inside the shell. Ideally, it is located at the wide/large end of the egg. When an egg is first collected, the air cell will be small but during incubation, it quickly becomes larger. As the embryo grows, moisture is lost through the cell’s pores, which causes the air cell to increase in size. When I was new to incubating, I would take a pencil and mark the air cells’ positions before I set them in the bator and when I would candle, I would mark the position again. It’s interesting to see how quickly the air cell grows in three weeks.
I candle much more often than is necessary or recommended. You can see from this picture that there are many pencil lines marking the days on which I candled- that is generally not a good idea. Most incubators are very sensitive to fluctuations in temperature and humidity and too-frequent opening of the incubator can compromise the hatch. A good rule of thumb is to candle at days 7, 14 and 18.
These are photos that I took today of my Buff Orpington egglets. The visibility is not what I would ordinarily expect from light brown eggs, but I can tell that all five are developing!
Hatch-along:Part 1, Part 2, Part 3, Part 4, Part 5, Part 6, Part 7, Part 8


I found your site last night & love it. I was watching the live feed, of the chickens hatching but can not find it today. Could you please post where to find it, thanks!!
Oh loved this post. I'm new to chickens and I'm just living ur information thank you so much.
I do it after dark.
Should I wait until she is off the nest to test the eggs as there are a dozen under the Little Bantam. She is only leaving the nest in the morning. If I can test the eggs, I could remove the bad ones.
Should you wait to do what, Gloria?