
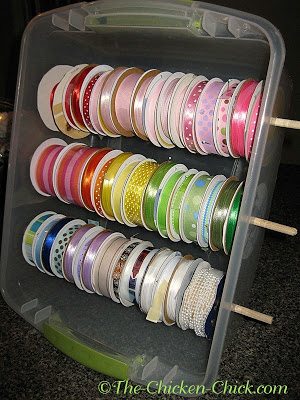
This ribbon organizer tote is easy to make, inexpensive and stackable. I contemplated other storage methods that involved affixing the ribbon spools to a stationary rack, (wall-mounted, etc.) but opted for the flexibility of being able to store and use the ribbon in a variety of locations with this system.
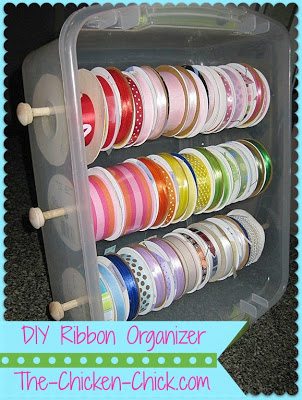
DIY RIBBON ORGANIZER
SUPPLIES NEEDED
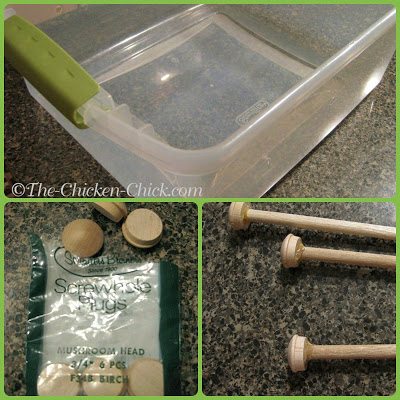
A sturdy plastic container with lid
5/16” Wooden dowels
A 5/16” drill bit and drill
Permanent marker
Hot glue gun
¾ inch, wooden, screw-hole plugs (alternatively, Tinker toys may fit these
dowels. I think they would be adorable on both ends, but would be glued on the finished end only.)
LET’S MAKE IT!
Measure and mark the spacing of dowel holes on the container with a permanent marker. On each side of the box, the first holes should be approximately 2.5” from the short end of the box, approximately 2.5-3” down into the depth of the box, and a minimum of 5 inches away from each other going down the length of the box. (Use ribbon spools to gauge placement, making sure that they match up on the opposite side. Mark as many holes as will fit spools and dowels. I used three dowels.)
Using 5/16” bit, drill the holes in the container according to the marks.
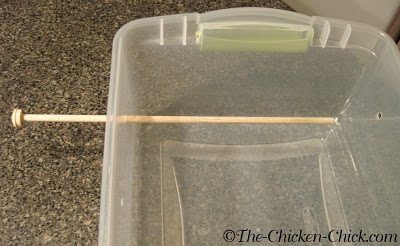
For dowel length, measure container’s width and add 2 inches to measurement. (The dowels will extend about an inch or so beyond the outside of the container.)
Cut all dowels to measured length. (Dowels are small enough to use a serrated knife to score around the dowel and then snap off the excess.)
Using 5/16” bit, drill holes in the wooden screw-hole plugs half way through. Put some glue inside the hole and insert a dowel, which should fit tightly.
When glue is dry, push a dowel through one hole in the box & load it up with ribbon. When full, push the dowel through the second,
corresponding hole.
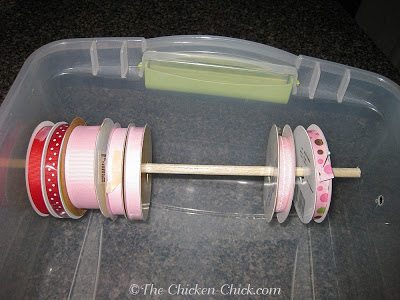
I thought I might need something to secure the unfinished end of
the dowel in place, but the dowels fit so tightly that they stay in place without help. I secure the ribbon ends to the rest of the spool with
either a small tab of tape or a sewing pin.

This was shared here: Cheerios & Lattes,I Gotta Try That, Lou Lou Girls,Made In a Day, Sewlicious Home Decor, Wake up Wednesday

Kathy Shea Mormino
Affectionately known internationally as The Chicken Chick®, Kathy Shea Mormino shares a fun-loving, informative style to raising backyard chickens. …Read on


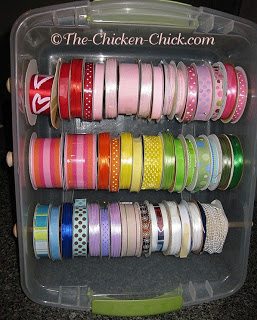
This ribbon organizer tote is easy to make, inexpensive and stackable. I contemplated other storage methods that involved affixing the ribbon spools to a stationary rack, (wall-mounted, etc.) but opted for the flexibility of being able to store and use the ribbon in a variety of locations with this system.
DIY RIBBON ORGANIZER
SUPPLIES NEEDED
A sturdy plastic container with lid
5/16” Wooden dowels
A 5/16” drill bit and drill
Permanent marker
Hot glue gun
¾ inch, wooden, screw-hole plugs (alternatively, Tinker toys may fit these
dowels. I think they would be adorable on both ends, but would be glued on the finished end only.)
LET’S MAKE IT!
Measure and mark the spacing of dowel holes on the container with a permanent marker. On each side of the box, the first holes should be approximately 2.5” from the short end of the box, approximately 2.5-3” down into the depth of the box, and a minimum of 5 inches away from each other going down the length of the box. (Use ribbon spools to gauge placement, making sure that they match up on the opposite side. Mark as many holes as will fit spools and dowels. I used three dowels.)
Using 5/16” bit, drill the holes in the container according to the marks.
For dowel length, measure container’s width and add 2 inches to measurement. (The dowels will extend about an inch or so beyond the outside of the container.)
Cut all dowels to measured length. (Dowels are small enough to use a serrated knife to score around the dowel and then snap off the excess.)
Using 5/16” bit, drill holes in the wooden screw-hole plugs half way through. Put some glue inside the hole and insert a dowel, which should fit tightly.
When glue is dry, push a dowel through one hole in the box & load it up with ribbon. When full, push the dowel through the second,
corresponding hole.
I thought I might need something to secure the unfinished end of
the dowel in place, but the dowels fit so tightly that they stay in place without help. I secure the ribbon ends to the rest of the spool with
either a small tab of tape or a sewing pin.
This was shared here: Cheerios & Lattes,I Gotta Try That, Lou Lou Girls,Made In a Day, Sewlicious Home Decor, Wake up Wednesday


That is a really great idea! I am always looking for ways to be more organized!
Thanks so much for linking up with The Great Blog Train!
Laura @ Mice in The Kitchen
http://www.miceinthekitchen.com/
Here is another cute idea for storage for craft supplies. Don't know where this came from, if it was off your site (Thanks!). I really like your ribbon tote. Martha
Very nice. I just have mine in a tote that lies flat so they don't move, but if you use a lot of ribbon you can unroll it without making a mess. Thanks for sharing.
Great idea!
Totally love that it's dust proof…thanks for the tutorial.