
What IS the Deep Litter Method? (aka: Built-Up Litter System) Deep litter is a method of chicken waste management that calls for droppings and bedding material to compost inside the chicken coop instead of being cleaned out and replaced regularly. With the deep litter method, a carbon-based litter such as pine shavings absorbs nitrogen from chicken droppings, which ferments in an odor-free process to produce a rich, valuable humus just as in a traditional compost pile.
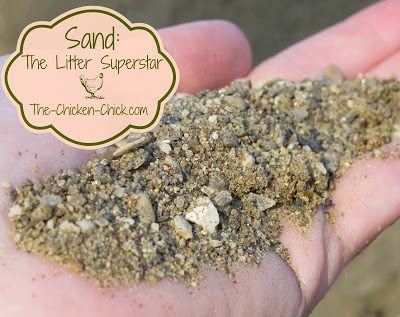
While I personally cannot bring myself to allow waste to accumulate inside my coops, I do not doubt the utility of the deep litter method when executed properly. I personally prefer sand as a coop litter choice and droppings boards to manage manure. Deep litter can be a time saver for chicken-keepers who use traditional types of litter, but it can also be a health hazard to the flock when implemented incorrectly. If choosing to employ the built-up litter method, it should be well understood and properly managed.
A Little About Composting
The deep litter method of waste management is not very different from ordinary garden composting except in that it occurs inside the chicken coop and the chickens help manage the process.
Under ideal conditions, composting proceeds through three phases: a moderate-temperature phase, which lasts a coupe of days, a high temperature phase, which can last from a few days to a several months, and a several-month cooling and maturation phase. The various phases are controlled by different communities of microorganisms (bacteria, actinomycetes, fungi, protozoa, etc.) and macroorganisms (flies, ants, beetles, etc).1 In order for the various organisms to transform organic matter into valuable garden fertilizer efficiently, they must be fed, oxygenated and watered properly.2
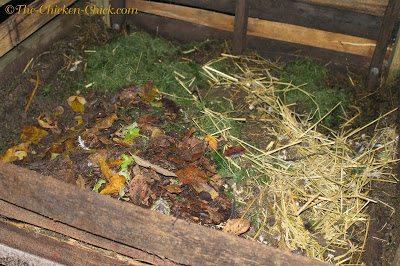
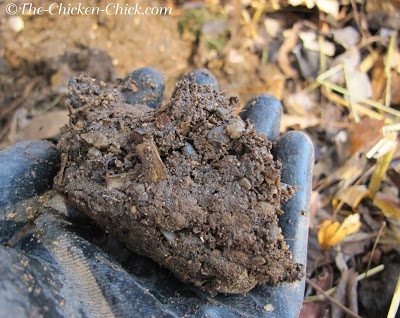
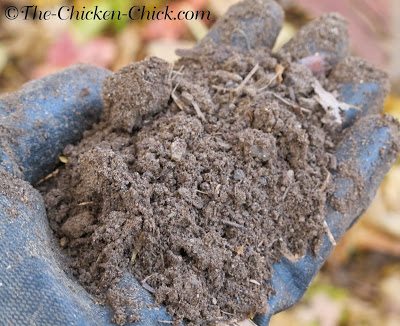
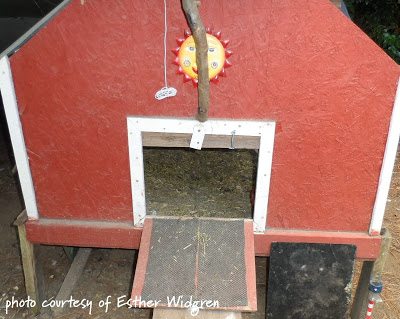
My chickens turn the compost pile regularly. The top, left portion of the photo shows droppings & leaves that were removed from the coop this week, the bottom, right portion of this photo shows seasoned litter and droppings after a few months.
Deep Litter Requirements
1. A carbon-based litter material (pine shavings, leaves, grass clippings, etc.) and droppings, of course, which are nitrogen-based.
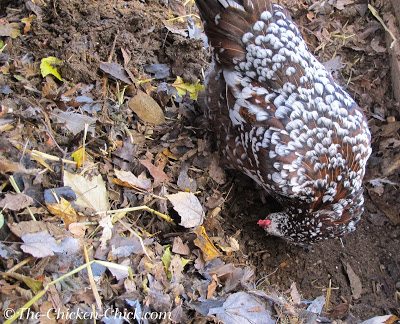
2. Oxygen. Proper aeration of the litter is essential. The chickens will take care turning much of the litter, but it must be monitored and areas that are missed or become caked, turned. The less time chickens spend inside the coop, the more turning will have to be performed by the chicken-keeper.
3. Proper coop ventilation. Cross-ventilation and open eaves are ideal. Ensure no drafts exist, particularly over roosts. Excess moisture and ammonia gasses must have a means of escape.
4. Correct moisture balance. Moisture is essential to the process. Droppings consist of 85% water, making it less likely that the litter will become too dry than too wet. Wet litter is a recipe for sick chickens. Stir in any water spills from drinkers and add litter when necessary to prevent matting.
THE DOs
DO begin building up litter in the spring. Deep litter requires months to process properly. It should enter its warmest phase of decomposition in autumn when the heat it generates is a welcome addition.
DO start with 4-6 inches of pine shavings. Other litter materials can be added after the composting process is well underway, but don’t begin the process with straw, hay, grass, etc. The smaller the litter pieces, the faster they will break down. Fine shavings will break down faster than flake shavings for example.

DO maintain a litter depth of 4-6 inches. As it decomposes and dwindles in depth, add more litter material. It is usually necessary to build a lip at the entrances to the coop so the litter does not spill out.
DO aerate, aerate, aerate. This process requires oxygen to work and while the chickens will do the bulk of the turning, attention must be paid to neglected areas, particularly wet areas such as those around waterers. If portions of the litter take on an ashy, whitish appearance, the litter must be turned as it is oxygen-deprived. Be sure to break up any caked areas that the chickens haven’t turned.
More pine shavings or leaves need to be added.
DO monitor the moisture content. The litter should be equally moist and the same consistency throughout. When stirred, the litter should crumble. When picked up and squeezed in the hand, it should hold its shape initially and then crumble. If it holds together without crumbling or if water can be squeezed out of it, the litter is too wet. If it does not hold its shape momentarily, it is too dry. Stir in any moisture from waterers. Better yet, don’t keep the waterer inside the coop.
DO remove some of the litter when it reaches 12 inches in depth, leaving a couple inches on the floor or the coop to jump-start the next batch.
THE DON’Ts
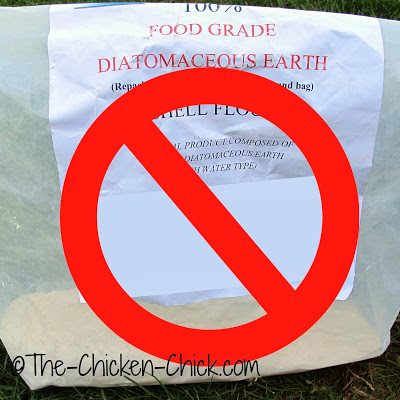
DON’T use diatomaceous earth inside a coop while employing the deep litter method. DE is a drying agent- it will dry out the litter and kill beneficial insects and microorganisms necessary for composting.
DON’T use straw or hay for the initial base litter material. Neither is absorbent and both can carry mold and fungi, which are detrimental to chicken’s respiratory systems. Allow the wood shavings and manure to establish the microorganisms and heat necessary to kill molds and fungus before adding chopped straw or hay.
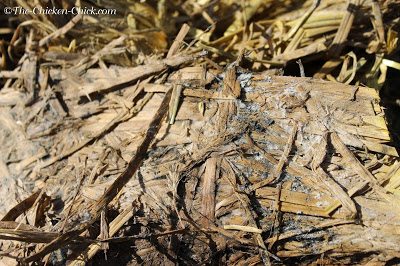
The growth of the mold and fungus on this straw is the result of anaerobic activity, an enemy of the deep litter system. Turning the litter regularly and maintaining the proper moisture content is necessary to avoid these dangers inside the chicken coop.
DON’T allow any ammonia odor to build up or remain inside the coop. Ammonia is an indicator that the method is not working properly. Ammonia build up can cause eye and respiratory irritation to the birds and lower their resistance to disease. Ammonia can also negatively impact growth of young birds and egg production in laying hens. Check the coop ventilation and litter moisture level and add more of each if necessary.
DON’T let the bedding get wet and remain wet. Wet litter facilitates the growth of mold, coccidiosis and harmful bacteria, which can make the chickens sick. Wet litter can also cause bumblefoot to develop on chickens’ footpads. If possible, keep waterers out of the coop.
DON’T regularly clean the litter out of the coop as removal defeats the purpose of this method, preventing it from growing beneficial organisms, reaching the high heat composting phase and becoming self-sanitizing.

DON’T overcrowd the coop and expect deep litter to work. The litter/droppings ratio must be carefully balanced and too many chickens will result in too much poop for the method to work properly. The minimum space requirement per bird inside the coop is four square feet.
DON’T remove all of the litter at the end of winter/beginning of spring. Leave a couple of inches of the composted litter in the coop and turn the rest out into the garden. The composted litter in the coop will kick-start the next batch. Cleaning out all of the litter eliminates all of the beneficial microbes and the desirable ecosystem that took months to cultivate. Why waste it? I like to think of the mature, inoculated litter as the “mother,” just as we use a mother in making of apple cider vinegar. The mother is a symbiotic culture of bacteria and other microbes, which hastens the production of the next batch and is worth its weight in gold.
DON’T continue using deep litter after disease has been identified in the flock. Clean out the litter, sanitize the coop and start from scratch with fresh pine shavings after the health issue has been resolved.
The Dangers of Deep Litter
When managed incorrectly, deep litter will produce toxic ammonia gasses, harbor parasites such as Capillaria worms and harmful bacteria, endangering the health of the flock. Deep litter that is too dry will be dusty and can carry airborne spores that are detrimental to chickens’ respiratory health. If you don’t think you can manage the deep litter system properly, it’s safer to use an alternate coop litter program and do the composting outside the coop.

Sources & further reading:
1. http://compost.css.cornell.edu/microorg.html
2. http://web.extension.illinois.edu/homecompost/science.cfm
http://www.agrowingculture.org/2011/08/humanure-part-iii-thermophillic-bacteria-composting-stages-the-sanitization-of-compost-joe-jenkins/
http://cru.cahe.wsu.edu/CEPublications/eb1784e/eb1784e.pdf
http://rodaleinstitute.org/2012/turning-compost-by-temperature/
http://extension.unh.edu/resources/files/resource000811_rep844.pdf
Storey’s Guide to Raising Chickens, Damerow, Gail. Storey Publishing, 1995.

Kathy Shea Mormino
Affectionately known internationally as The Chicken Chick®, Kathy Shea Mormino shares a fun-loving, informative style to raising backyard chickens. …Read on


What IS the Deep Litter Method? (aka: Built-Up Litter System) Deep litter is a method of chicken waste management that calls for droppings and bedding material to compost inside the chicken coop instead of being cleaned out and replaced regularly. With the deep litter method, a carbon-based litter such as pine shavings absorbs nitrogen from chicken droppings, which ferments in an odor-free process to produce a rich, valuable humus just as in a traditional compost pile.
While I personally cannot bring myself to allow waste to accumulate inside my coops, I do not doubt the utility of the deep litter method when executed properly. I personally prefer sand as a coop litter choice and droppings boards to manage manure. Deep litter can be a time saver for chicken-keepers who use traditional types of litter, but it can also be a health hazard to the flock when implemented incorrectly. If choosing to employ the built-up litter method, it should be well understood and properly managed.
A Little About Composting
The deep litter method of waste management is not very different from ordinary garden composting except in that it occurs inside the chicken coop and the chickens help manage the process.
Under ideal conditions, composting proceeds through three phases: a moderate-temperature phase, which lasts a coupe of days, a high temperature phase, which can last from a few days to a several months, and a several-month cooling and maturation phase. The various phases are controlled by different communities of microorganisms (bacteria, actinomycetes, fungi, protozoa, etc.) and macroorganisms (flies, ants, beetles, etc).1 In order for the various organisms to transform organic matter into valuable garden fertilizer efficiently, they must be fed, oxygenated and watered properly.2
My chickens turn the compost pile regularly. The top, left portion of the photo shows droppings & leaves that were removed from the coop this week, the bottom, right portion of this photo shows seasoned litter and droppings after a few months.
Deep Litter Requirements
1. A carbon-based litter material (pine shavings, leaves, grass clippings, etc.) and droppings, of course, which are nitrogen-based.
2. Oxygen. Proper aeration of the litter is essential. The chickens will take care turning much of the litter, but it must be monitored and areas that are missed or become caked, turned. The less time chickens spend inside the coop, the more turning will have to be performed by the chicken-keeper.
3. Proper coop ventilation. Cross-ventilation and open eaves are ideal. Ensure no drafts exist, particularly over roosts. Excess moisture and ammonia gasses must have a means of escape.
4. Correct moisture balance. Moisture is essential to the process. Droppings consist of 85% water, making it less likely that the litter will become too dry than too wet. Wet litter is a recipe for sick chickens. Stir in any water spills from drinkers and add litter when necessary to prevent matting.
THE DOs
DO begin building up litter in the spring. Deep litter requires months to process properly. It should enter its warmest phase of decomposition in autumn when the heat it generates is a welcome addition.
DO start with 4-6 inches of pine shavings. Other litter materials can be added after the composting process is well underway, but don’t begin the process with straw, hay, grass, etc. The smaller the litter pieces, the faster they will break down. Fine shavings will break down faster than flake shavings for example.
DO maintain a litter depth of 4-6 inches. As it decomposes and dwindles in depth, add more litter material. It is usually necessary to build a lip at the entrances to the coop so the litter does not spill out.
DO aerate, aerate, aerate. This process requires oxygen to work and while the chickens will do the bulk of the turning, attention must be paid to neglected areas, particularly wet areas such as those around waterers. If portions of the litter take on an ashy, whitish appearance, the litter must be turned as it is oxygen-deprived. Be sure to break up any caked areas that the chickens haven’t turned.
More pine shavings or leaves need to be added.
DO monitor the moisture content. The litter should be equally moist and the same consistency throughout. When stirred, the litter should crumble. When picked up and squeezed in the hand, it should hold its shape initially and then crumble. If it holds together without crumbling or if water can be squeezed out of it, the litter is too wet. If it does not hold its shape momentarily, it is too dry. Stir in any moisture from waterers. Better yet, don’t keep the waterer inside the coop.
DO remove some of the litter when it reaches 12 inches in depth, leaving a couple inches on the floor or the coop to jump-start the next batch.
THE DON’Ts
DON’T use diatomaceous earth inside a coop while employing the deep litter method. DE is a drying agent- it will dry out the litter and kill beneficial insects and microorganisms necessary for composting.
DON’T use straw or hay for the initial base litter material. Neither is absorbent and both can carry mold and fungi, which are detrimental to chicken’s respiratory systems. Allow the wood shavings and manure to establish the microorganisms and heat necessary to kill molds and fungus before adding chopped straw or hay.
The growth of the mold and fungus on this straw is the result of anaerobic activity, an enemy of the deep litter system. Turning the litter regularly and maintaining the proper moisture content is necessary to avoid these dangers inside the chicken coop.
DON’T allow any ammonia odor to build up or remain inside the coop. Ammonia is an indicator that the method is not working properly. Ammonia build up can cause eye and respiratory irritation to the birds and lower their resistance to disease. Ammonia can also negatively impact growth of young birds and egg production in laying hens. Check the coop ventilation and litter moisture level and add more of each if necessary.
DON’T let the bedding get wet and remain wet. Wet litter facilitates the growth of mold, coccidiosis and harmful bacteria, which can make the chickens sick. Wet litter can also cause bumblefoot to develop on chickens’ footpads. If possible, keep waterers out of the coop.
DON’T regularly clean the litter out of the coop as removal defeats the purpose of this method, preventing it from growing beneficial organisms, reaching the high heat composting phase and becoming self-sanitizing.
DON’T overcrowd the coop and expect deep litter to work. The litter/droppings ratio must be carefully balanced and too many chickens will result in too much poop for the method to work properly. The minimum space requirement per bird inside the coop is four square feet.
DON’T remove all of the litter at the end of winter/beginning of spring. Leave a couple of inches of the composted litter in the coop and turn the rest out into the garden. The composted litter in the coop will kick-start the next batch. Cleaning out all of the litter eliminates all of the beneficial microbes and the desirable ecosystem that took months to cultivate. Why waste it? I like to think of the mature, inoculated litter as the “mother,” just as we use a mother in making of apple cider vinegar. The mother is a symbiotic culture of bacteria and other microbes, which hastens the production of the next batch and is worth its weight in gold.
DON’T continue using deep litter after disease has been identified in the flock. Clean out the litter, sanitize the coop and start from scratch with fresh pine shavings after the health issue has been resolved.
The Dangers of Deep Litter
When managed incorrectly, deep litter will produce toxic ammonia gasses, harbor parasites such as Capillaria worms and harmful bacteria, endangering the health of the flock. Deep litter that is too dry will be dusty and can carry airborne spores that are detrimental to chickens’ respiratory health. If you don’t think you can manage the deep litter system properly, it’s safer to use an alternate coop litter program and do the composting outside the coop.
Sources & further reading:
1. http://compost.css.cornell.edu/microorg.html
2. http://web.extension.illinois.edu/homecompost/science.cfm
http://www.agrowingculture.org/2011/08/humanure-part-iii-thermophillic-bacteria-composting-stages-the-sanitization-of-compost-joe-jenkins/
http://cru.cahe.wsu.edu/CEPublications/eb1784e/eb1784e.pdf
http://rodaleinstitute.org/2012/turning-compost-by-temperature/
http://extension.unh.edu/resources/files/resource000811_rep844.pdf
Storey’s Guide to Raising Chickens, Damerow, Gail. Storey Publishing, 1995.


Very helpful!
fingers crossed for the scale