There are two ways to acquire eggs for hatching: from a henwho has been mated to a rooster locally or shipped from someone else’s flock. I do not currently have a mature rooster in my backyard to fertilize my hens’ eggs, so I purchased some Buff Orpington eggs, which were delivered in the mail. In order to understand where we’re going with this whole chick hatching thing, it’s a good idea to understand a few egg basics.
THE EGG: FERTILIZED & UNFERTILIZED EGGS
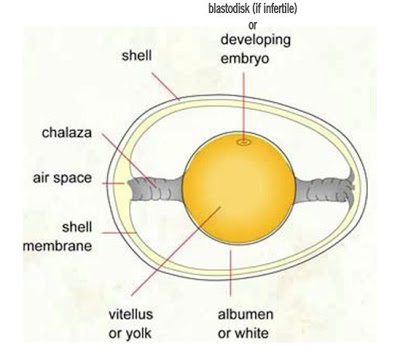
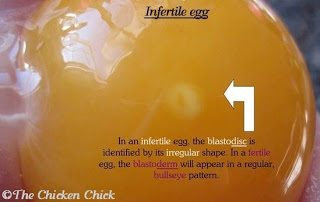
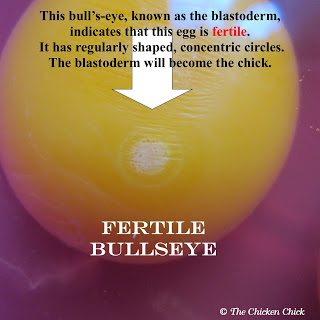
Unfertilized eggs have come from a hen that had not been inseminated by a rooster and as such, will never hatch chicks. All eggs contain a concentration of cells on the yolk called the blastodisc, which is identified by its light color and irregular shape. The blastodisc contains only the hen’s DNA.
When an egg is fertilized by a rooster, the blastodisc becomes known as the blastoderm, which is the first stage of embryo development. The blastoderm, also known as the germinal disc, is characterized by its bull’s-eye appearance of regular, concentric circles. The blastoderm will remain in a state of suspended animation, so to speak, until a hen begins sitting on the egg or it is placed in an incubator at the proper temperature.
How can you tell whether an egg is fertilized without opening it or incubating it? You can’t. (edited to add: much more information about fertilized eggs here.)
CARING FOR HATCHING EGGS
Eggs that will not be incubated immediately after collection should be carefully handled and stored properly. Clean hatching eggs should be gently and infrequently handled with clean hands and should never be washed. The embryo relies on its outermost layer, called the bloom or cuticle, to protect it from bacteria; washing the egg removes the bloom, making the embryo susceptible to spoilage and risks contaminating other eggs during incubation.
Hatching eggs should be stored in a clean, pulp egg carton with the wide end facing up and kept at temperatures between 45°-60° F until ready to be incubated. The carton should be turned from side to side 3-5 times daily to prevent the blastoderm from sticking to the eggshell. For eggs stored longer than a few days, humidity should be controlled to minimize moisture loss from inside the egg. Humidity can be maintained by wrapping the carton in plastic. The target humidity is 75%.
HATCHABILITY
A fertilized egg stands its best chance of hatching when incubated within 7 days of being laid by a hen. After day 7, the hatchability rate begins to decline. The fresher the egg is, the better the hatch rate can be. Fertilized eggs that have been collected locally (not shipped) and set within 7 days of being laid can be expected to result in an 80-90% hatch rate on average. Shipped eggs are a much greater challenge.
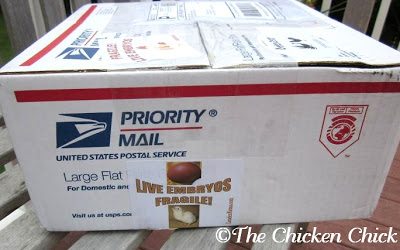
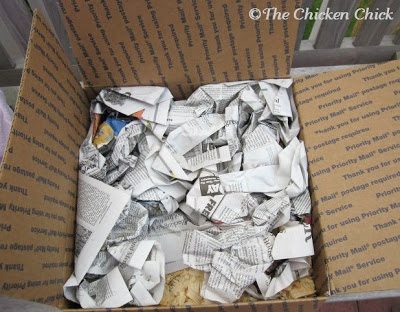
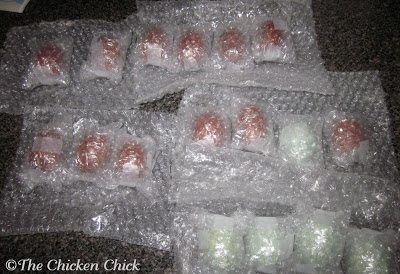
This is a well-packaged shipment of hatching eggs. They all arrived perfectly intact.
Given that shipped eggs tend to be slightly older than locally gathered eggs and have been handled significantly more, (and who knows how roughly) one should not expect a hatch rate greater than 50%. I like to order two to four times the number of hatching eggs as the number of hens I hope to add to my flock.
Three days ago, I received a package of Buff Orpington hatching eggs in the mail from a breeder two hours away from my house. The trip was short, but there is no way of knowing how the eggs were handled in transit. They were well packaged and none were broken upon arrival. That’s a good start.
SETTING EGGS IN THE INCUBATOR
Prior to the arrival of the eggs, I cleaned and sanitized my incubator to ensure that no bacteria from the last hatch could compromise this hatch. After I washed my hands and unpacked the eggs, I allowed them to sit on the counter for 12 hours. While it is usually recommended that shipped eggs rest for 24 hours, I am impatient and 12 hours is the best I could do this time. I like to number the eggs so that I can track their progress individually, but marking them is not always necessary. Eggs should be turned at least three times per day to prevent the developing embryo from sticking to the side of the shell. My incubator has an automatic turner, but not all incubators do, so some people mark eggs with an X on one side and an O on the other to keep track of turning. A pencil or permanent marker are both safe to use for marking eggs.
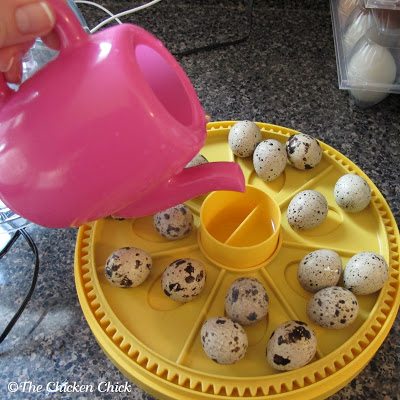
Only one water well is filled for the first 18 days, on the 18th day, (aka: lockdown) both are filled. The photo above was obviously not my Buff Orpington eggs, they were Coturnix quail eggs.
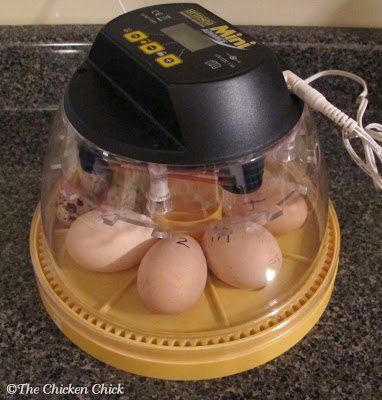
These are the Buff Orpington eggs that I set five days ago. My incubator does not require much of a warming-up period, so I tend to turn it on an hour or so before placing the eggs in it. I programmed the temperature on the Mini Advance to 99.8°F, the turner to rotate the eggs every 45 minutes and added water in one of the center wells, which will regulate the humidity automatically. The eggs were set on Saturday, September 15th, today is September 20th and I will candle them tonight! Stay tuned for the photo results next time!
Hatch-along Part 1, Part 2, Part 3, Part 4, Part 5, Part 6, Part 7, Part 8
*Anatomical illustrations and photo reproduced for educational purposes, courtesy of Jacquie Jacob, Tony Pescatore and Austin Cantor, University of Kentucky College of Agriculture. Copyright 2011. Educational programs of Kentucky Cooperative Extension serve all people regardless of race, color, age, sex, religion, disability, or national origin. Issued in furtherance of Cooperative Extension work, Acts of May 8 and June 30, 1914, in cooperation with the U.S. Department of Agriculture, M. Scott Smith, Director, Land Grant Programs, University of Kentucky College of Agriculture, Lexington,and Kentucky State University, Frankfort. Copyright 2011 for materials developed by University of Kentucky Cooperative Extension. This publication may be reproduced in portions or its entirety for educational and nonprofit purposes only. Permitted users shall give credit to the author(s) and include this copyright notice. Publications are also available on the World Wide Web at www.ca.uky.edu. Issued 02-2011
Kathy Shea Mormino
Affectionately known internationally as The Chicken Chick®, Kathy Shea Mormino shares a fun-loving, informative style to raising backyard chickens. …Read on


shop my SPONSORS
There are two ways to acquire eggs for hatching: from a henwho has been mated to a rooster locally or shipped from someone else’s flock. I do not currently have a mature rooster in my backyard to fertilize my hens’ eggs, so I purchased some Buff Orpington eggs, which were delivered in the mail. In order to understand where we’re going with this whole chick hatching thing, it’s a good idea to understand a few egg basics.
THE EGG: FERTILIZED & UNFERTILIZED EGGS
Unfertilized eggs have come from a hen that had not been inseminated by a rooster and as such, will never hatch chicks. All eggs contain a concentration of cells on the yolk called the blastodisc, which is identified by its light color and irregular shape. The blastodisc contains only the hen’s DNA.
When an egg is fertilized by a rooster, the blastodisc becomes known as the blastoderm, which is the first stage of embryo development. The blastoderm, also known as the germinal disc, is characterized by its bull’s-eye appearance of regular, concentric circles. The blastoderm will remain in a state of suspended animation, so to speak, until a hen begins sitting on the egg or it is placed in an incubator at the proper temperature.
How can you tell whether an egg is fertilized without opening it or incubating it? You can’t. (edited to add: much more information about fertilized eggs here.)
CARING FOR HATCHING EGGS
Eggs that will not be incubated immediately after collection should be carefully handled and stored properly. Clean hatching eggs should be gently and infrequently handled with clean hands and should never be washed. The embryo relies on its outermost layer, called the bloom or cuticle, to protect it from bacteria; washing the egg removes the bloom, making the embryo susceptible to spoilage and risks contaminating other eggs during incubation.
Hatching eggs should be stored in a clean, pulp egg carton with the wide end facing up and kept at temperatures between 45°-60° F until ready to be incubated. The carton should be turned from side to side 3-5 times daily to prevent the blastoderm from sticking to the eggshell. For eggs stored longer than a few days, humidity should be controlled to minimize moisture loss from inside the egg. Humidity can be maintained by wrapping the carton in plastic. The target humidity is 75%.
HATCHABILITY
A fertilized egg stands its best chance of hatching when incubated within 7 days of being laid by a hen. After day 7, the hatchability rate begins to decline. The fresher the egg is, the better the hatch rate can be. Fertilized eggs that have been collected locally (not shipped) and set within 7 days of being laid can be expected to result in an 80-90% hatch rate on average. Shipped eggs are a much greater challenge.
This is a well-packaged shipment of hatching eggs. They all arrived perfectly intact.
Given that shipped eggs tend to be slightly older than locally gathered eggs and have been handled significantly more, (and who knows how roughly) one should not expect a hatch rate greater than 50%. I like to order two to four times the number of hatching eggs as the number of hens I hope to add to my flock.
Three days ago, I received a package of Buff Orpington hatching eggs in the mail from a breeder two hours away from my house. The trip was short, but there is no way of knowing how the eggs were handled in transit. They were well packaged and none were broken upon arrival. That’s a good start.
SETTING EGGS IN THE INCUBATOR
Prior to the arrival of the eggs, I cleaned and sanitized my incubator to ensure that no bacteria from the last hatch could compromise this hatch. After I washed my hands and unpacked the eggs, I allowed them to sit on the counter for 12 hours. While it is usually recommended that shipped eggs rest for 24 hours, I am impatient and 12 hours is the best I could do this time. I like to number the eggs so that I can track their progress individually, but marking them is not always necessary. Eggs should be turned at least three times per day to prevent the developing embryo from sticking to the side of the shell. My incubator has an automatic turner, but not all incubators do, so some people mark eggs with an X on one side and an O on the other to keep track of turning. A pencil or permanent marker are both safe to use for marking eggs.
Only one water well is filled for the first 18 days, on the 18th day, (aka: lockdown) both are filled. The photo above was obviously not my Buff Orpington eggs, they were Coturnix quail eggs.
These are the Buff Orpington eggs that I set five days ago. My incubator does not require much of a warming-up period, so I tend to turn it on an hour or so before placing the eggs in it. I programmed the temperature on the Mini Advance to 99.8°F, the turner to rotate the eggs every 45 minutes and added water in one of the center wells, which will regulate the humidity automatically. The eggs were set on Saturday, September 15th, today is September 20th and I will candle them tonight! Stay tuned for the photo results next time!
Hatch-along Part 1, Part 2, Part 3, Part 4, Part 5, Part 6, Part 7, Part 8












I love that you fill the water chambers using a tiny teapot. Cute!
I love hatching eggs, my incubator has been running scene December. ! of my Serama hens just hatched out 4 excitingly different color chicks then I have had before, can't wait to see how they turn out.
Kathy, you are sharing some very interesting information. You make a great teacher! Thank you very much for sharing your knowledge.
Thanks so much, Nancy! My pleasure.
Can’t wait to see how they do. I plan to hatch some eggs in the early spring. I ordered my incubator and am so excited. Thanks for the lessons:-)
Say a hen and rooster mated, then the hen was kept away from all roosters. How long will that hen be able to produce fertilized eggs after she has been mated?
The next egg that comes down the pike after she has been inseminated can be fertile.
I have hatched eggs that were laid a week after the hens were removed from the rooster. I was told that they can be fertile up to 2 weeks after. I happened to receive a couple of cuckoo marans that had been with a copper rooster right when my buff orpington mix went broody and refused to not be broody! So I stuck 7 eggs under collected from the 2 cuckoos over the next week. She hatched 5 of them…1 she accidentally smashed midway through (it was developing) and the other was a quitter about halfway through (which we found… Read more »
I have hatched eggs that were laid a week after the hens were removed from the rooster. I was told that they can be fertile up to 2 weeks after. I happened to receive a couple of cuckoo marans that had been with a copper rooster right when my buff orpington mix went broody and refused to not be broody! So I stuck 7 eggs under collected from the 2 cuckoos over the next week. She hatched 5 of them…1 she accidentally smashed midway through (it was developing) and the other was a quitter about halfway through (which we found… Read more »
I have hatched eggs from hens that were away from the rooster for 1 week. I received 2 cuckoo marans that had been with a copper right when my buff orpington mix went broody. I kept a weeks worth of eggs from the 2 hens, which ended up being 7 eggs, and put them under "Penny". Penny hatched out 5 chicks. 1 egg was broken halfway through, developing normally, and one was a "quitter" about halfway through. So the whole week's worth were fertile. At that time I was told the eggs can be fertile for 2 weeks!